Wednesday, 30 June 2010

Perfect boiled rice — the easy way

For years, I've been simultaneously puzzled, astonished and amused by those who boil their rice in an excess of water, then drain and wash out the starch under running hot water. Never mind that hot water from the boiler adds copper from the pipes — not exactly the healthy option — what madness is this?

Yes, I know lots of Chinese now use electric rice-steamers, but I prefer to cook mine the analogue way. Apart from not having the room for storage (mine is somewhere deep in the bowels of the shed), it's the culinary difference between driving automatic and manual.

Preferring the feel of the gear stick in my hand, here's how I do it.

First, choose your rice.

The easiest and quickest to cook is white rice. I was brought up on long grain American rice but I really like white basmati and fragrant Thai. The problem is that, being refined, with the husk and nutrients that sit just under the skin removed, you get a hypoglycaemic hit as all those carbohydrates make demands on your poor old pancreas to pump out insulin.

However, working on the principle that a little of what you fancy is what the doctor ordered, enjoy it but maybe not every day.

I usually use organic brown basmati as I get the nutrients plus roughage and it doesn't take quite as long to cook as standard brown rice.

A mug of rice for two peopleFor two people, add about a mug of dry raw rice to a small saucepan and give it a rinse under cold running water. White rice has a lot of loose starch on the surface so you'll have to do this several times, swirling it with your hand, until the water runs clear.
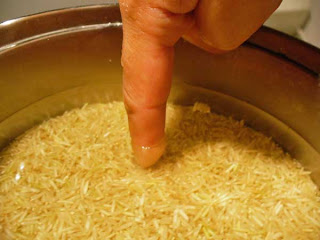

Add water to depth of one knuckleThen, instead of fiddly measuring devices, add water up to a depth of one knuckle above the white rice.

No matter how much you cook, the principle is one knuckle depth of water above the rice. This is true of white, but for some strange reason, it's a little less with brown. About three-quarters should do it.

Chicken stock cube and boiling riceAdd a sprinkle of salt or low-sodium salt. I cheat and crumble in one Kallo organic chicken stock cube.

Place a tight lid on top and bring to the boil over a high heat. Then turn all the way down — you want the lowest heat so make sure the pan is on the smallest ring. Simmer for 15 minutes for white Thai fragrant and basmati, 20 minutes for long-grain white rice, 40 minutes for organic brown basmati, and ten years, I mean, 50 minutes for standard brown rice.

Whatever you do, DO NOT remove the lid and have a poke around. Control your curiosity and trust me. If you have a glass lid, you'll see little steam holes appearing in the rice as the water is absorbed. If not, think of Schrodinger's Cat. It is both cooked and not cooked until the moment you are allowed to peek. (Dear lord, now I've mentioned cat in a recipe!)

perfect fluffy boiled riceRemove from the heat at the end of the cooking time, open the lid and give it a stir with a wooden spoon or spatula, and immediately replace the lid so it can continue to steam under its own steam for another five minutes and fluff up.

There it is, via the traditional Asian method. Serve with something delicious from this blog.

FOOD SAFETY: There's a technique for removing the arsenic found in rice that Sheffield scientists came up with in 2020. Add raw rice to boiling water and boil for five minutes. Drain (BBC viewers can find comfort in washing under cold running water at this point) and add enough boiling water from the kettle to bring it up to the depth of one knuckle above the rice as above. Because it is hot, do not use your actual knuckle at this stage but measure it with an implement and measure that against your finger. Add lid, bring back to the boil for the usual time minus the five minutes.

EQUIPMENT NOTE: If you don't want to burn your rice, use a pan with a thicker base. I use a steel pan with a thick copper base. But if the rice does catch, Chinese people like the crispy bits, as long as it's not burnt to the point of being bitter.

Tuesday, 29 June 2010

Stir-fry noodles with garlic, ginger and seared salmon

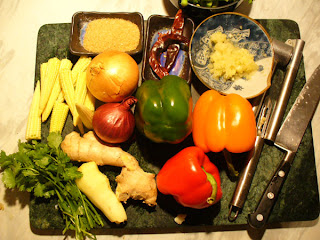
Stir-fried vegetables with noodles and seared salmon fillets is a simple dish that's quick to make once you've washed and prepared the veg. The principles here form the basis of a lot of Cantonese cooking so it's worth trying this recipe. You cut the vegetables into more or less bite-size pieces that can cook quickly in very hot oil so they are hot but still crunchy inside. Ingredients: Sauce: garlic bulb, fresh ginger root (or powdered ginger), brown sugar, light soy sauce, half teaspoon chilli seeds (optional). Egg Noodles (or gluten-free rice noodles if you prefer wheat-free) 1 x red & 1 green pepper, deseeded, sliced 1 medium Spanish onion plus small red onion (optional) 1 or 2 dried chilli peppers or 1 fresh (optional). Sliced. Coriander 2 x salmon fillets. Very fresh as they will be seared outside and raw inside. Schwartz Steak Seasoning Peanut or rapeseed oil Sesame oil Make up your ginger and garlic marinade as I showed you last week. This is your cooking sauce. If you slice the last bit of ginger and add it when cooking the vegetables, you get the additional taste-bud hit when you bite into it. vegetables for sir fryingYou can also select vegetables from baby sweetcorn, mange-tout, broccoili, water-chestnuts. My Dad used peeled and deseeded cucumber, plus celery, cut into batons. Today, I've bought some baby sweetcorn and broccoli sprouts but there's a whole wide world of fresh vegetables out there for you to choose from. Sliced vegetables for Chinese stir fryWash the peppers and baby sweetcorn. Halve the sweetcorn lengthways. Deseed and slice the peppers. Skin then cut the onion in half — top to bottom. Cut each half lengthways (from sprout to root end) two or three times, depending on size, so you have three or four chunks of onion. Separate the layers of the onion — very Zen, ma-a-an. Wash the coriander, separate the bottom leaves from the stalks, and keep the stalks to add to the stir fry. (The leaves are sprinkled raw on top at the end.) Put on a pan of salted water to boil for the noodles. Don't do what I did and skimp on size, meaning you end up with the water level near the top so you can't boil vigorously. You want it at a fairly rolling boil so allow plenty of room for the noodles to kick up. Heat up a tablespoon of peanut (or rapeseed) oil in the wok or heavy-based pan you are going to use to fry in. It should be big with highish sides as you are going to be moving around very hot ingredients. Frying pans with a thin base will not give you a good result and will be murder to clean afterwards. Now ... some chefs say you should add the sauce to the oil before the ingredients to flavour the oil. But whenever I try that I end up burning the sauce. So what I do is get the oil smoking hot and add the vegetables ONE BATCH AT A TIME. I start with onions. They should sizzle as they hit the hot oil. Move them around with spatula so they don't catch, and after a few seconds, add a tablespoon of the sauce, a few slices of chilli pepper, then a dash of sesame oil. Keep stirring for a few moments. Don't overcook. Remember, hot but crunchy. Remove to a dish and cover with a lid to keep warm. Heat more peanut or rapeseed oil in the pan and do the same with the other vegetables, batch by batch, until they look like this. Noodles only take 4-6 minutes to cook, depending on the type. Add noodles to the boiling salted water — one block per person. (They usually come in measured proportions.) You can place a lid at an angle to lessen the steam produced, but don't cover fully. Turn down a bit but keep the noodles at a lively boil. I keep the skin on the salmon fillets as, like crackling, the skin is often the best bit if you like texture. The salmon just gets flashed in the pan so that it is raw in the middle. Get the oil hot as you sprinkle the salmon with one of my favourite cheat ingredients, Schwartz Steak Pepper Seasoning. Drop the salmon into the pan, skin-side down. Turn onto its side if it's thick enough, and end with it upper-side down. If you really can't face the prospect of raw fish, do it for longer but turn the heat down. You have to be gentle with fish. But it should still be moist and flaky inside. Meanwhile, drain the noodles. At this stage, you can have a bed of noodles with vegetables on top, topped with the salmon. Or, you can fry the noodles if you really need those extra calories, turning all the time so they don't catch. Then add the vegetables and any remaining sauce and mix together for a few moments. Pop the salmon on top and sprinkle with coriander leaves. I can't understand why some people seem to flinch at the mere mention of sesame oil. It has a delicious toasted nutty flavour. Because cooking weakens the flavour, add it at the end. This is a healthy dish with very little of the vitamins and nutrients lost in the process of cooking. But bear in mind that there is salt in the soy sauce and wheat in a lot of noodles. UPDATE: I am reminded by a vegetarian friend that they also have to eat. So ... you can use tofu cut into cubes and blanched in boiling water for a few moments to firm it up. Then treat the same as the salmon. You can also add cashew nuts or sunflower seeds to the stir-fry for protein. But do be aware that seeds and plant oils are high in Omega 6. Veggies are likely to be short of the long-chain EPA form of Omega 3 which is mostly found in fish. Read more here.

Friday, 25 June 2010

Chinese ginger and garlic marinade: basic and easy

Here's a Chinese marinade my dear old Dad taught me when I was knee-high to a grasshopper, Grasshopper.

It's a basic one made from crushed garlic, grated ginger root, brown sugar and soy sauce. Dark soy is usually used in marinades but, as this one is being used in a stir-fry with seared salmon, I went for the light soy. Remember that light soy is a bit saltier. I've also added a few crushed chilli seeds for variation on the theme.

UK Chinese often use Golden Syrup instead of sugar. You can experiment with a dollop of honey as well, although that's an interesting fusion rather than traditional Chinese cooking.

INGREDIENTS:
1 small bulb (whole bulb, not a clove) crushed garlic,
1 heaped dessertspoon grated ginger root (peel first)
1 heaped dessertspoon brown sugar
Half cup of soy sauce (light used here)
Optional: Half teaspoon chilli seeds

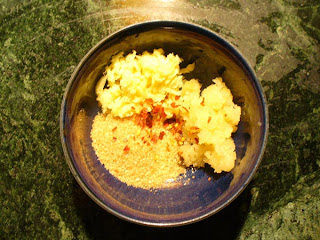
Chinese marinade with ginger, garlic and sugar
From the top, clockwise: crushed garlic, chilli seeds (optional), brown sugar, grated ginger root.


Chinese marinade with ginger, garlic and sugar
Note that the main ingredients — garlic, ginger, sugar — are in roughly equal proportions: third, third, third. Mix together with soy sauce to make a paste.


Chinese marinade with ginger, garlic and sugar
It should look something like this, a thick sauce. OK, you're ready for cooking.


USES: In stir-fries. To marinade meat or fish, make it a bit thicker by using less soy sauce, remembering to score the meat first. Make fresh each time, although the salt in the soy sauce should mean this is good in the fridge for a few days.

CHEAT POINT: If you are in a rush or have run out of fresh root ginger, you can use a dessertspoon of powdered ginger instead.

Thursday, 24 June 2010

Scrambled eggs with hot chilli sauce

scrambled eggs on toastOK, this could have been a disaster.
I’d knocked up a quick scrambled eggs on buttered wholemeal toast for brunch today, using the organic potato, sweet potato and carrot mash left over from last night. I did this adding milk (optional), salt, pepper, chopped chives from the garden, and two eggs.

Instead of tomato ketchup, I thought I’d try a splash of sweet chilli sauce over the top. Unfortunately, I got my bottles mixed up and, instead of using the one on the right, I used the straight chilli sauce on the left which is fairly explosive.

However, it gave the meal a lovely piquant kick and tasted gorgeous, especially washed down with a cuppa tea.

(First posted at Wordpress 23rd June 2010)

Garlic preparation: two methods for crushing

I’ve seen people struggling with all sorts of ways to prepare crushed garlic for cooking. One of the more tedious tasks, it’s usually foisted onto the designated sous chef — in my home, Loved One.

But having discovered the perfect garlic press in Ikea, I’ve never looked back. I bought a load for my friends and they seem very happy with it.

The Ikea marvel is different from all the others because it has a large barrel into which you can cram entire fat cloves without them slipping out. It even separates the outer skin, squeezing the flesh through the holes and leaving the skin behind.

The only drawback is that the metal seems quite soft and over time (two years) you see little bits missing. I’m onto my second in about five years.

This may be obvious to some, but here’s how I prepare my garlic. I’m using the larger fresh elephant garlic here because it’s in season. It isn’t as strong as the common supermarket variety so you need more of it. The skin is softer and doesn’t have to be removed for use in the garlic press, but for the purposes of this demonstration I’m showing you the easy way to remove the skin. (Click on pix for larger images.)


What you need

Assemble garlic bulb, press, large knife and a bowl.


Skinning garlicDeskinning garlic clove

The secret of removing the skin without it cutting up under your nails is to give it a bash with the blade of a large knife, holding it flat by the handle in one hand and thumping down on the flat of the blade with the heel of the other.


Preparing garlicSkinned garlic clove

This splits the skin away from the clove so you can easily pick it off.


Ready to crush in the press

Place the clove into the garlic press …


… and squeeze.

Garlic grows from the barrel of a garlic press


The finished product.

Pure and simple. Pure unadulterated crushed garlic with no salt or other additives.


Pasting with salt as an abrasive
The real chef’s method but with a high salt content.

Method:
Peel your garlic cloves, cut off the tough end and slice the clove finely.
Slice crossways so you have tiny diced bits.
Sprinkle liberally with salt.
Place wide blade of knife on top at an angle of about 15 or 20 degrees (almost flat) and press down making tiny circular movements.
The salt acts as an abrasive and you end up with a fine paste depending on how long you keep it up.

On a health note, freshly crushed garlic is better for your heart than processed. Garlic’s beneficial health properties may be due more to the hydrogen sulphide content than its antioxidants as previously thought. Science Daily

Instant Japanese miso soup for breakfast

Japanese miso soup for breakfastInstant. Usually a word to strike terror into the heart of a proper foodie when prefacing consumables such as “coffee”. But, as when it renders “gratification” immediate, “instant’ is not always a bad thing.

Just so here. In the pic, instant Japanese miso soup in Chinese mugs. How’s that for cultural fusion? Ideal for when you can’t face a full-on English breakfast but fancy a savoury hit.

Miso soup is usually found as an accompaniment to Japanese meals. It is light and comes in a variety of forms, always containing healthy seaweed.

The mug on the left contains Tofu Miso Soup, containing red and white miso soybean paste and tiny tofu chunks, and is made by adding hot water to the dehydrated ingredients. It also contains seaweed, green onion, kelp, bonito (fish) and, sadly, monosodium glutamate (MSG a sodium salt originally made from healthy seaweed but not healthy itself). Powdered kelp and bonito make up the traditional dashi stock when you add hot water.

The other miso soup comes in a fancier double sachet, with the miso in the form of a paste rather than dehydrated, and also contains spring onion, wakame seaweed and, ahem, “flavourings”.

The ingredients aren’t held in suspension so you need a spoon to get to the bits at the bottom

BTW, the mugs can be found for around £3 in Chinese supermarkets. They come with matching lids to keep your drink hot — ingenious but simple. I particularly like the blue and white rice-grain one on the left as it is thinner porcelain and doesn’t draw out the heat like lots of china. Similar to bone china, but not as delicate or expensive, this property means that you get a good cuppa tea even with a tea-bag. (Make mine a Picard Special: Tea! Earl Grey! Hot!)

(Brought over from WordPress)

Essential Asian food ingredients: the basics

Asian food productsWhat's in the Chinese kitchen? I can usually knock up a tasty east Asian meal at a moment’s notice without having to send Loved One up the shops and risk him getting lost in the pub while I fret over a smoking wok. You can too if you have the basics stored in the kitchen larder. Having a bag of prawns or seafood in the freezer, or a carton of tofu in the fridge, helps. As do peppers and onions.

The picture above shows a selection of what I was able to draw out from my cupboards just now. It gives me a wide range of flavours and textures with which to turn basic noodles or rice into something heavenly.

The staple of most Asian meals is either rice or noodles. I prefer brown rice or even brown basmati rice because it’s healthier — “punishment rice” as Loved One calls it. He’s more a potato guy but doesn’t look like one, fortunately for me.

The absolute must-have for Chinese cuisine is soy sauce: light or dark. This is fermented soy bean, grain and salt so you can put away the salt-cellar. Other bottles and jars contain: oyster sauce, black bean sauce, fish sauce, hoi sin sauce, plum sauce, BBQ sauce. In a while I’ll show you how to make a basic marinade as taught me by my Dad, but for now, purchased ready-mades will suffice.

I give a curry kick to some dishes using red or green curry paste, laksa paste, or crushed chilli seeds. As a cheat I sometimes use Schwartz Steakhouse Pepper which is gorgeous but expensive in the quantities that I use as it only comes in silly little jars.

Tins of waterchestnuts and bamboo shoots add a lovely texture to basic dishes. Tins of coconut milk, low fat or normal, are great for curries and laksa soup.

Spices should include powdered ginger, turmeric, dried chilli seeds and chillis, and five spice powder. Fresh flavourings come from garlic bulbs, ginger, kaffir lime leaves, lemon grass, coriander and fresh chillis.

Condiments include wasabi mustard, sweet chilli sauce.

Oils. I cook mostly with olive oil, peanut oil, sunflower and sesame. If you are worried about peanut allergy, use rapeseed oil instead. Peanut and rapeseed are what you use when you stir-fry and need to get the oil smoking hot. There’s evidence that high temperatures make lighter, healthier oils such as sunflower and safflower behave like carcinogenic hydrogenated fats, so use as little as possible. I always add a little sesame oil at the end for the wonderful pungent flavour.

If any of this looks so strange that it’s frightening you, don’t worry. I’m going to be walking you through some recipes so you’ll end up confident and familiar with the most exotic foodstuffs.

A basic list of ingredients you should have in your kitchen cupboards and fridge for cooking Asian dishes.

Dry goods:
Brown rice, basmati, long grain white rice, Thai jasmine rice
Egg noodles, wheat noodles, rice noodles. Fine and wide.
Dried Chinese/shitake mushrooms (have to soak for around 15 minutes before using)
Pre-soaked dhal (lentils) for South Asian cooking
Sesame seeds

Spices and flavourings:
Powdered ginger, turmeric, dried crushed chilli seeds, and five spice powder
Dry kaffir lime leaves and lemon grass
Whole coriander seed
Whole cumin seed
Whole black pepper
Whole dried Chillies
Fish stock cubes (I am such a cheat but who can boil up fish bones for months in order to get half a cup of stock?)
Organic chicken stock cubes. (Ditto)
Schwartz Steak Seasoning (cheats’ ingredient)
Salt (generally not needed if using soy sauce)
Sugar or golden syrup
Sherry or rice wine (chef’s privilege)

Sauces and pastes:
Soy sauce: light and dark (light is saltier, dark for marinades)
Tamari (wheat-free soy sauce)
Oyster sauce, black bean sauce, chilli bean sauce, fish sauce, hoi sin sauce, plum sauce, BBQ sauce
Red or green curry paste, laksa paste
Shrimp paste
Sweet chilli sauce (for dipping)
Wasabi mustard (for dipping sashimi and sushi)
Cornflour or rice flour for thickening

Oils:
Peanut (groundnut) or rapeseed oil for stir-frying (requires a hot temperature)
Sesame oil

Tins:
Tins of waterchestnuts, bamboo shoots
Coconut milk, light or normal fat

Fresh:
Garlic bulbs, fresh ginger, kaffir lime leaves, lemon grass, and fresh chillis
Limes
Coriander
Spring onions
Onions
Peppers
Kaffir lime leaves and lemon grass

Freezer/fridge:
Frozen pancakes for Peking Duck
Frozen prawns or mixed seafood
Frozen dimsum
Cartons of tofu (beancurd)
Clotted cream. Not Asian but I love it.

Plus fresh fish, meat, fruit and vegetables bought several times per week, if not daily

(Post brought over from WordPress)

East Asian foodie goodness: welcome to Anna Chen Eats

Welcome to my new blog, Anna Chen Eats, in which I explore all aspects of one of my favourite subjects in the whole wide world: East Asian food. Chances are it’s one of your favourites, too. So do check out my restaurant reviews, interviews, news, recipes and photos of a British Chinese blogger’s attempts to feed herself all things nice.

I’ll be scouring UK East Asian catering high and low (mostly low, she growled). Those cheap noodle bars are great — there should be on in every High Street and shopping centre. If I’m looking for fast food, I’d rather spend a few quid on a plate of spicy stir-fry noodles than a Big Mac.

But mid-to-high end is wonderful. We are spoilt for choice in the UK, mostly thanks to Britain’s colonial past. There’s a massive competition out there and the restaurant field can be a killing zone for restaurants that don’t get it right. I aim to guide you through the maze of eateries on offer. But gimme a chance — I can only do one dinner a day, no matter what Loved One says.

Want to know how Chinese eat at home? Hungry for that authentic experience? My own culinary know-how that I’ll be bringing you is everyday and practical, just like Mamma — and even better, Papa — used to make.

This is all subjective and about satisfying my own taste buds, and sharing that with you. As far as this blog is concerned, there is no right or wrong; just “does it work?” I hope you’ll stay for the ride.

I may stray from East Asian food if I am reporting my own cooking. A bit of a cheat, I know, but I guess that, as I am of Chinese extraction, my own experiments in the kitchen count as such, whether I’m cooking up a stir-fry or a nice fat bacon sandwich like the one I made for lunch today.

Happy eating.